tima’s DIY RCM – follow-up #2: Compelling Changes – Improved Results.
by Tim Aucremann
It’s been about a year since I built tima’s DIY RCM as described in my original article from the fall of 2017, published here on The Vinyl Press along with follow-up #1. Since that time I’ve cleaned hundreds of records in all conditions: previously cleaned, new, used, and a few abused. My expectations are now very high about what is possible for getting records clean. Not only do most records clean-up nearly noiseless (assuming they are not damaged), I get the job done in a way that is methodical and accomplished with scant fuss or mess – all along my stylus stays clean and my ears are happy.
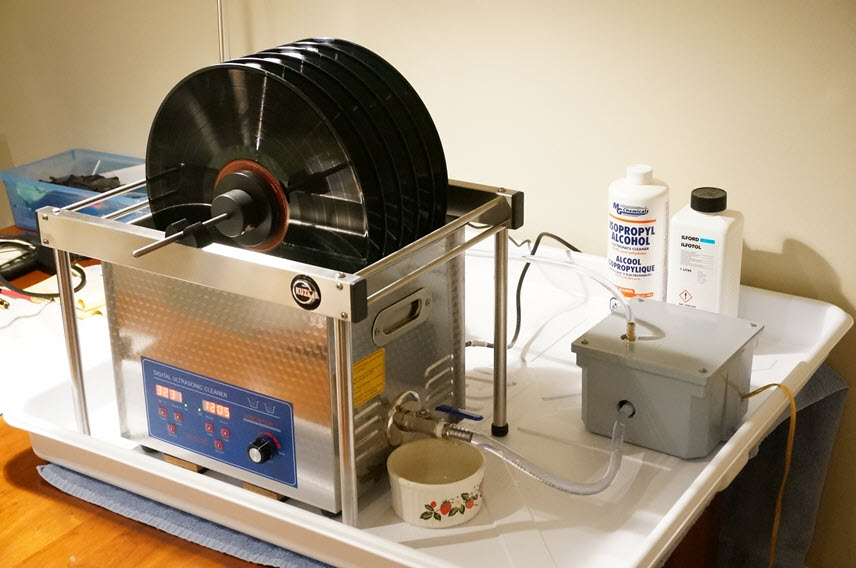
So while cleaning records is still ‘work’, it is contented work. And perhaps most significant, I’ll do it and not put it off. Typically I’ll clean a batch of six records followed by a batch of five. I base that on the number of spindles and spacers I have with the Kuzma RD rotisserie unit that holds and rotates the records in the cleaning bath. I run a spindle of records through the USC (Ultra Sonic Cleaner) for about 20 minutes. Each cleaning session for eleven records takes about 72 minutes from cover off to cover on; most of that is machine time not requiring my attention. I may do that 4-5 times a month, so good progress happens without seeming like endless toil.
I’ve learned stuff over the months with my DIY USC that led me to make some significant changes since my last installment, and that’s what I’m here to tell you about. As a lead-in to that, let’s first talk a little record cleaning methodology. This is a bit long, so bear with me please.
If you get a record wet to clean it, what’s the best way to get the record dry? I see two approaches: using air to dry the record (evaporation) or using a vacuum to suck water and/or cleaning solution off the record. (Yes, you can dry a record with a clean towel, but that’s not in our scope.) You can usually tell which drying method is in play by looking at the cleaning machine. When the record lays horizontal (flat) the machine uses vacuuming; either a wand with a slot (e.g. VPI) sits over a rotating record sucking up water, or a small vacuum nozzle rides across the rotating record like a tonearm (Monks, Loricraft.) Machines where the record stands vertical use some form of air drying; a rotating record passes in front of a blowing fan, or the record rests in stasis drying in open air – whether a fan is employed or not, this is drying by evaporation. Tima’s DIY RCM uses this last method.
I suppose each method has its pros and cons. The primary function of horizontal machines is drying (vacuuming) the record. The cleaning part is left to you; that is either application of cleaning solution and subsequent manual or automated scrubbing (less good), or light manual agitation of fluid to allow the solution chemicals to work to lift the dirt (better). The primary purpose of vertical machines is cleaning the record. Modern vertical (desktop) units rotate the record in a solution bath (some, water only) while subjecting it to ultrasonic waves that smash cavitation bubbles against the record surface in an effort to dislodge dirt. (The Audio Desk cleaner deploys both cavitation and soft rotating brushes against the record while it rotates in the bath.) The fancier vertical machines include a drying phase where the cleaning water is drained off and a fan blows air on the record at the end of the cleaning cycle.

Records air drying on their spindles.
In my opinion drying wet records is the biggest challenge faced by the USC user. When I tell people that tima’s DIY RCM uses non-mechanical open air drying they tend to be skeptical.
Here’s what happens: The batch of records comes out of the USC bath on their spindle. I hold the spindle with two hands and give a few shakes. I use a small amount of Ilfotol wetting agent in the cleaning solution so the water mostly sheets off, leaving a damp sheen with a small pie slice of wetness. I place the spindle in its holder pie slice down where it sits at a 45° angle and the records dry in less than 20 minutes depending on room temp and air humidity. Drying may take less time if I use a small, slow, 5-inch fan placed about four feet away to gently circulate the air around the spindles.
Whether fan drying or air drying, the idea is for the water/solution to turn into gaseous form – to leave the record and move into the air. Any solids residing in the water/solution remain on the record as it dries, regardless if you use a fan or non-mechanical open air drying.
So what’s the big deal – why rattle on about all this?
The critical element of any form of air drying is not having record detritus, dirt or other gunk (solids) in the water on a record when it dries.
So okay, that’s not rocket science. But think about this: each time you wash a record in the same solution that you used to wash other records in, the solution gets dirtier. Even if the cleaning process removes dirt from the record, the water remains dirty. Yes, you can add multiple rinse steps – that’s largely required with horizontal machines. Yes, you can buy another desktop unit just for rinsing with water alone (or change the water in your tank before drying each record) but the rinse water itself will still take on the dirt residing in the water on the record you just cleaned. Some of that dirt will be on the record that you dry and remain there.
If you think this is all fanaticism, I won’t disagree. I want my records clean. This leads us (finally) to the first of the changes I made to my cleaning process: improved air drying through better water quality caused by better filtration and monitoring.
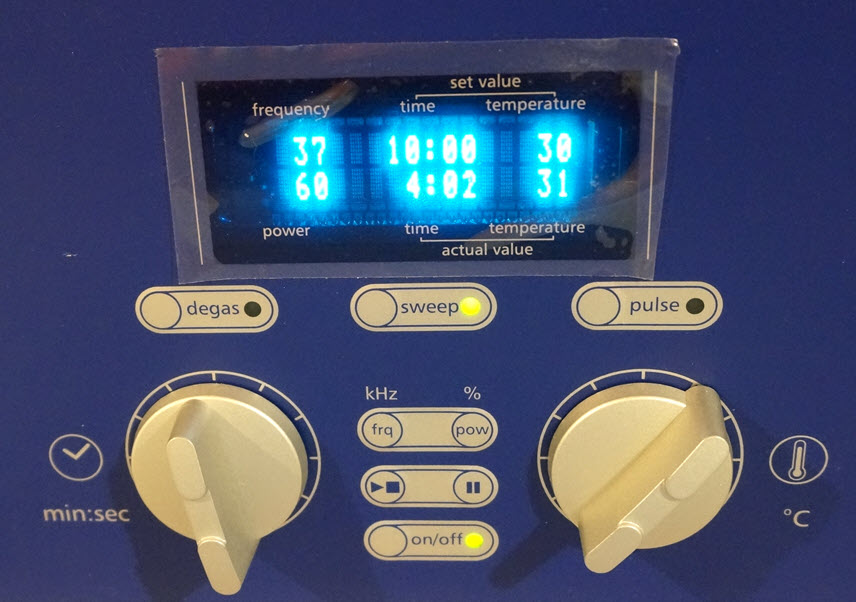
To keep tabs on dissolved solids in the cleaning solution I bought a 7Pros TDS meter ($17, Amazon.) It takes just a moment to measure TDS(total dissolved solids) as PPM(parts per million) and EC (electrical conductivity) along with temperature(both F° and C°). (There’s a check for your cleaning solution temperature. I aim for ~33° and set my USC temp control for 30° because the cavitation action will raise water temps as it goes.) Tip: I suggest owners of any desktop RCM user (Audio Desk, KLAudio, etc.) monitor water quality – especially in those units without active filtration.
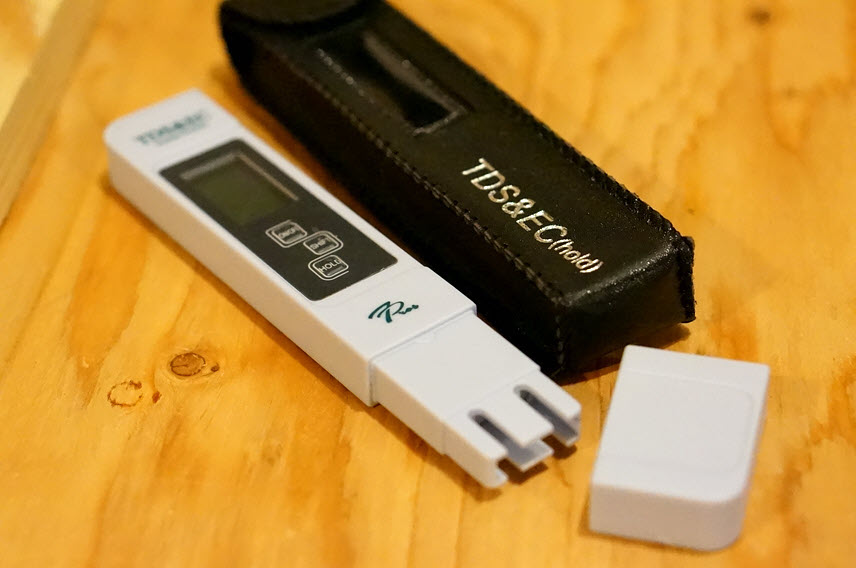
7Pros meter – switch between TDS/EC with Fahrenheit/Centigrade.
With fresh cleaning solution (~3 gallons distilled water, 1.3 cups IPA, 0.9 tablespoon Ilfotol) the meter shows 0000-0001ppm in my tank. After cleaning say, 44 records, I get a tank reading of 0005ppm TDS, using filtration methods described below. (Make sure to use high quality chemicals.) I’m not a water guru but I consider this an excellent result; my household drinking water is RO (reverse osmosis) filtered and that comes in at 0028ppm.
Tip: if you are inclined to include Hepastat disinfectant in your cleaning solution be advised it can significantly raise TDS. With a small amount of Hepastat in the water I saw end-of-cycle TDS readings in the 0028-0035ppm. I will not use it. After all, it is easy and cheap to change my homemade solution more frequently.
Of course the key to clean water while cleaning records is to keep the water clean– and here that is done with active pressurized filtration. My first article on tima’s DIY RCM shows the pump unit and water filter I put together to do active filtering.
Those TDS numbers above are the result of improved filtration because recently I upgraded my filter from the one originally used on my DIY RCM. I switched from a 1 micron Hydronix SDC-25-0501 2-1/2” x 4-7/8” NSF Sediment Filter to a 0.35 micron Flow Max FM-0.35-975 2-1/2” x 9-3/4” Pleated Filter. I did not know about this finer filter when I started out but felt going from 1 micron to 0.35 micron was pretty significant and worth the relatively small expense to switch. The new filter is twice the length of the earlier one so now I use the Pentek 158116 ¼” #10 Slim Line filter housing. This is almost identical to my original housing except taller. Cost to switch? Canister + filter, less than $30.
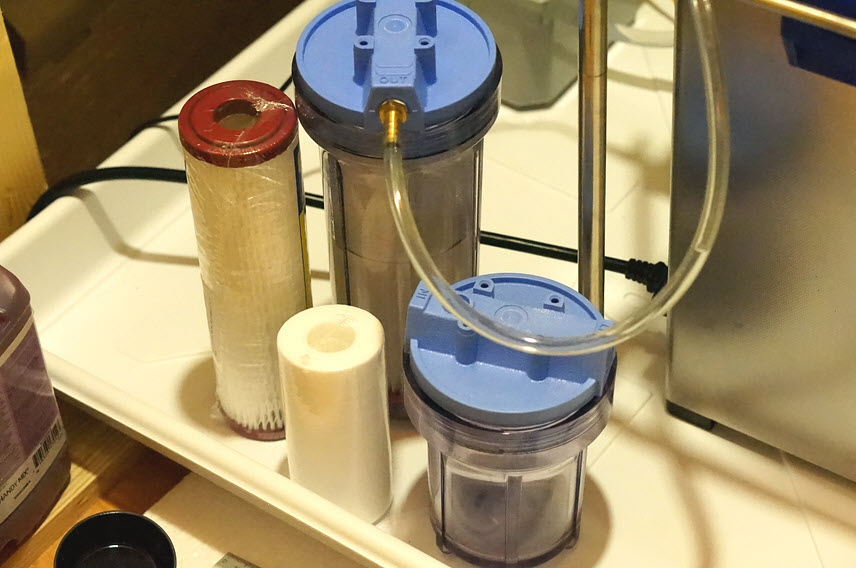 New 0.35 micron pleated filter and taller Pentek canister vs original units.
Identically sized filter caps on each Pentek canister meant all I changed was the clear cartridge housing – no need to de-hose or change barbs using the same canister caps. (Tip: if you go this route, look outside Amazon for the Flow Max filter for less dinero.) My pump has no problem pushing water through the new taller filter.
This was an easy-to-do, low cost upgrade and I’m glad I did it – those low TDS numbers tell the tale. 0.35 microns is 0.00001377952 of an inch. Consider this: according to cartridge guru Peter Lederman, the size of a micro-ridge stylus is 3.8 x 75 microns. A diagram in the article linked to Lederman’s name shows the dimension of the tip of an example Line Contact Stylus as 1.5 microns. In his article An LP Primer – How an LP Works(PDF download) Robert Harley observes a stylus is capable of registering a physical feature in the record groove of 0.1 micron in size.
What’s it mean here? It means that by using an active filter any water remaining on a record is far less likely to contain residue and dirt that potentially can be left on the record when it is dried by native air or fan than drying a record wet having unfiltered water. It means that by using a 0.35 micron filter instead of a 1.0 micron filter, any water remaining on the about-to-dry records may be almost three times more likely to contain fewer stylus registerable particles (pops & clicks), when I pull the records from the USC tank. Based on continual listening observations of records cleaned under these conditions, I find that natural evaporative air drying works really well. It is not about how the air is moved; it is about how clean the water is remaining on the record. Fine grained active filtering further reduces unpleasant playback noises.
-=-
Last year when I decided to build my DIY RCM I spent a fair amount of time checking out the various USC tank options, of which there are plenty. Based on advice from Franc Kuzma and others from the Internet, the features I looked for were these:
- The USC tank size had to accommodate the Kuzma RD rotisserie – the frame that holds a spindle of records and turns them at about ~0.5 rpm. Size-wise that meant a tank of at least 2.65 gallons (10 liters.)
- A stainless steel tank with a heater, temperature display and a thermostat to automatically turn off the heater.
- A timer to cut off the ultrasonic cavitation action.
- Power of at least 240W, but more was preferable.
- Variable power control.
- A tank with a drain option to which I’d attach tubing to feed the filter I planned to add. Also to make tank draining simple.
Kuzma also suggested a unit able to operate at two frequencies, low and high, around 40 kHz and 80 kHz. Lower frequencies produce larger cavitation bubbles with stronger implosion that are better at removing larger dirt particles. Higher frequencies create bubbles that don’t have quite as much force but do very well at getting into small spaces.
The 10L unit I bought from Beijing Ultrasonics a year ago did not have variable frequency, but met the other requirements, including variable power. I also chose this unit because of its price, $350 shipped direct from the factory. Starting out the whole DIY RCM thing was an experiment, a trial. I hoped for good results but did not know what to expect; I hung on to my Loricraft PRC3 point nozzle vacuum and my Audio Desk automated machine.
The Beijing Ultrasonic 10L in operation.
The Beijing Ultrasonic 10L worked fine and I was happy with its results (as described in my Follow-up #1.) Alas, it worked fine only for nine months when the variable power control went flakey; it could operate reliably only at full power. Even though the 10L was still inside its one year warranty period, I chose not to pay the cost (~$200) to ship it to and from China for repair. A friend of mine who tried to buy the same machine – on my suggestion – has had nothing but trouble with his transaction. After the premature failure of mine and the problems my friend suffered, I no longer suggest this machine.
My DIY RCM experiment was a fine success for cleaning records (other than the failed USC unit) and I am totally sold on the approach I took – it worked great for awhile; it did the job, especially since adding the 0.35 micron filter.
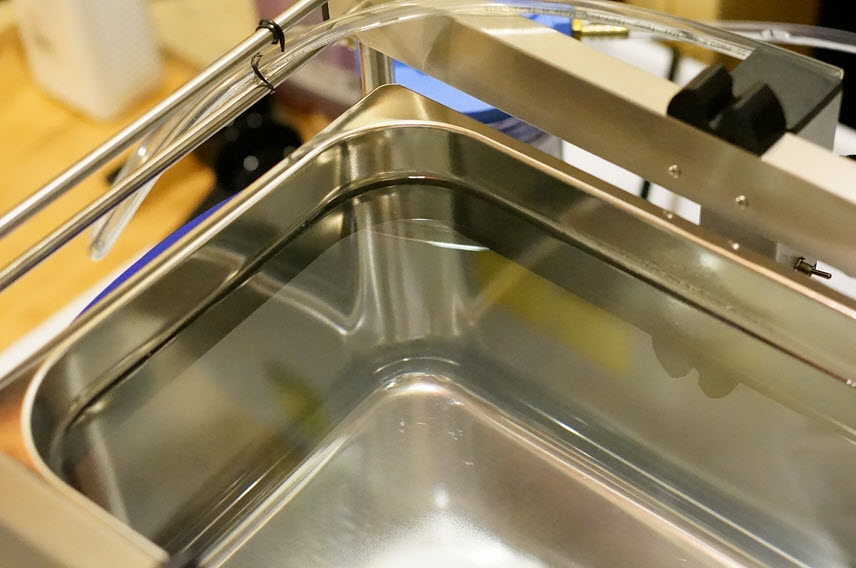
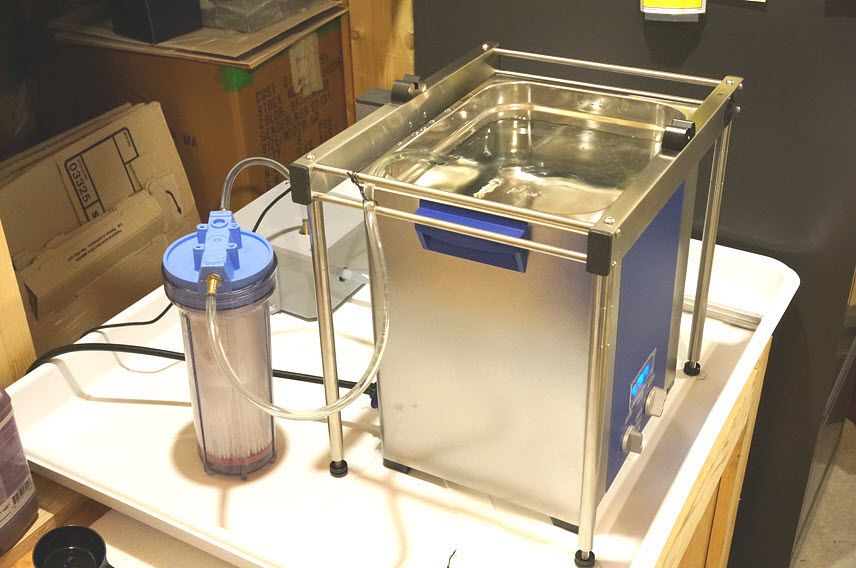
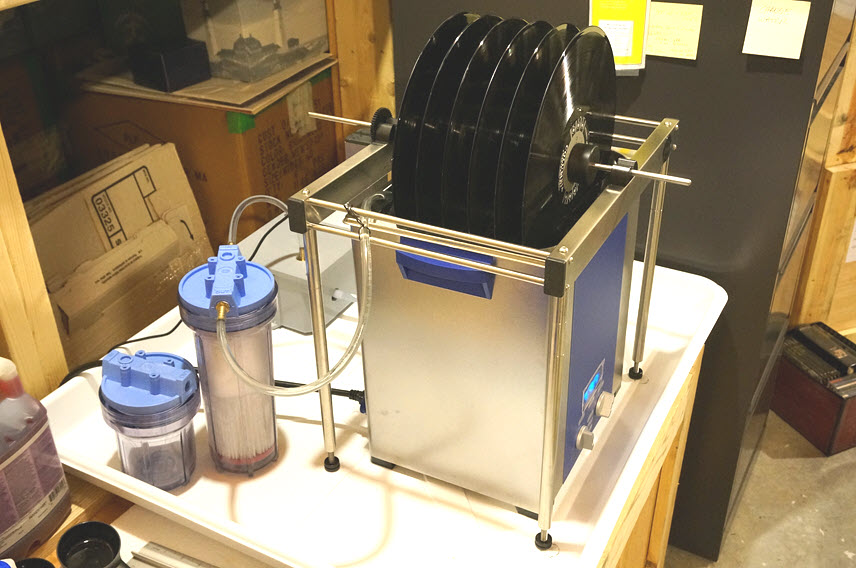
So I did some more homework then took the plunge and bought the USC recommended by Kuzma – a professional quality German made USC, the Elmasonic P 120H mentioned in my original article This machine is distributed and serviced in the U.S. by Tovatech and comes with a 2 year warranty. It is pricey; listing at $3000 but some discount may be found if your shop around. With a little dickering I paid $2450, shipped from an Elma authorized dealer.
My new Elma unit filled to its waterline.
The Elmasonic P120H meets all the requirements I listed above, including the ability to operate at 37 kHz and 80 kHz. Compared with the Beijing Ultrasonic unit, the Elma is more substantial, more powerful (330W), built with a higher quality case and a cavitation proof stainless steel tank, includes 6 transducers, and it is much quieter.
The P120H includes additional features not on my requirements list:
- A Sweep mode for optimal sound field distribution within the cleaning tank. I actually think this is a good feature to have. It causes disbursement of the cavitation action, so it is less concentrated above the transducers. The record grooves we’re cleaning on are on the outer thirds of the tank
- An automatic Degas mode to quickly degas fresh solution in the tank. If your water comes out of a pressurized supply it will contain dissolved gases that need to be removed for optimal cleaning performance. Dissolved gases in your solution will absorb cavitation energy. Read more here.
- The option for automatic alternation between high and low frequencies for simultaneous coarse and fine cleaning. I choose to make this switch manually just to keep tabs on operation: 10 minutes at 37 kHz, 10 minutes at 80 kHz.
- A Pulse mode to intensify cleaning power by 20%.
- More features related to automation and control.
Here is the Elma’s control panel. Protective film is still on the display so it’s a touch fuzzy.
All warmed up and ready to clean a spindle of records.
Working.
With the addition of the Elmasonic P120H USC, tima’s DIY RCM is now on par price-wise with the popular KLAudio and Audio Desk Systeme desktop cleaners. Of course with a less expensive USC the rig is a lot less money, although I feel adding the multi-frequency Elma was definitely worth it. In my opinion this approach is easily superior to today’s single-record desktop machines for many reasons, but I will not get into a comparative review here. Any machine that encourages record cleaning is a positive for the world of vinyl and I believe these recent efforts encourage continued viability for the medium. The main benefits of a DIY RCM (not necessarily mine) include: getting more records clean (really clean) in a shorter amount of time and that includes drying, control over the cleaning solution and control over the cleaning process – you choose water temperature and cleaning duration, and for me, it’s more fun!
By the way, solution temperature has a profound effect on ultrasonic cleaning effectiveness. Does your machine heat the water?
-=-
For those of you who made it to the end of Follow-up #2 of tima’s DIY RCM, I salute you. Thanks for reading here at The Vinyl Press. Here are some links to materials you may find interesting:
Here is a PDF download paper: Precision cleaning Process and Equipment Considerations for PMR Media. This is about cleaning perpendicular magnetic tape. Look at slide/page 16 for an interesting graph about the relationship between ultrasonic frequency and particle size. I believe this is from XYRATEX.
Gramophone styli and groove geometries talks about stylus sizes and the effect of stylus impact on a record groove. The forces in play when a stylus exerting 730 atmospheres* (~10728 psi) of pressure smacks head-on into a cloud of 10-micron sized asteroids sailing along at 1 knot can disfigure the groove wall or, thanks to heat generated by the forces in play, fuse those rocks to the vinyl itself.
*Assume the arm of a record player exerts a force of 0.0098N (the weight of 1 gram) on a record and the diameter of the stylus is 0.0013 cm (Assume a circular cross-section.) Pressure = Force/Area, so, p = (9.8 x 10⁻³ N) / (1.327 x 10⁻¹⁰m2) = 7.38 x 10⁷N/m2 = 730 atm
Here is a scholarly paper PDF download: Particle Removal Using Ultrasonic Cleaning from Ahmed Busnina, Assoc. Professor and his PhD student Ismail Kashkoush at the Center for Particulate Control Process Equipment at Clarkson University in Potsdam New, and a couple IBM engineers. If you don’t want to work through the whole thing, read part 4 Conclusions at the end. The reading stuff and grainy photos of cavitation bubble collapse and rebound are kinda interesting.
Here is another PDF download: Ultrasonic Cleaning – What is it? This is an article in outline format that contains a boatload of fascinating information about ultrasonic cleaning. This comes out of the EDGE group at the Rochester Institute of Technology College of Engineering, but has no attribution. Interesting mention of an ultrasonic cleaning disadvantage: “Loss of surface material due to microscopic bubble implosion”, but there is an “however”. This is worth a look if you’re into the topic.
Tim Aucremann
August 2018.
Tima is Tim Aucremann. After his academic years living in the 18thand 19thCentury with Hume, Kant and Hegel, Tim switched to a career in IT architecture and project management. An avid audiophile since trading in his Bose 901s for Maggies and a Hafler DH500 kit, today Tim continues “Living La Vida Vinyl.” Tim previously reviewed for Sound Stage!, and The Audio Beat; he now writes for Positive Feedback.
Hi Tim,
I have a KLA LP200 and have never felt comfortable with it due to its lack of filtering, doubts about the short cleaning time and poor results with readily observable surface smudges on used records etc. I have been looking for an alternative and your series of articles have been extraordinarily clear and helpful. And your process and conclusions make a great deal of sense to me. My sincere thanks for this assistance. I am just about to start collecting the components to implement your approach but there is one thing that I have not been able to find an explanation for, and that is can you optimally clean more than 1 record at a time. My question may point to my lack of understanding of how ultrasonic propagation works. I would think that you would need 1 transducer on either side of the record to be cleaned. I do not understand how the faces of multiple records not directly facing a transducer can be optimally cleaned. You note that you are using approximately 1.5″ spacing between records and a Google search refers to a “golden” 1″ spacing being fine. But I could not find any explanation of how this figure is arrived at. I would gratefully appreciate your thoughts.
Many thanks,
Chris
Hi Chris,
Thanks for your note.
There is plenty of research, some of it scientific, into ultrasonic cleaning generally, and into its specific use in various industrial scenarios. However, information about using ultrasonic cleaning for vinyl records is largely anecdotal although more and more experience each day is gained as people continue to try it and adopt it for keeping their record collections clean. That’s a long winded way to say that I can tell you what I know about how it works based on my own research and experience.
First, regarding your question “can you optimally clean more than 1 record at a time.” – imo, the clear answer is Yes. I say this with confidence because every time I clean records, I’ll clean 5-6 at a time and the results are excellent for each record I clean.
There may be a few RCMs for vinyl on the market that actually have a transducer on each side of a single record, I believe your KLAudio unit and the recently released Degritter machine from Estonia use two transducers on each side. I can’t speak to their effectiveness, but their approach seems reasonable, accepting they are only designed to clean a single record at a time. Both approaches use a closed tank that does not make it easy to clean.
But, transducers do not require direct aiming at the object they intend to clean for that cleaning to be effective.
We’ll skip the physics and say ultrasonic cavitation uses sound to generate tiny ‘bubbles’ of vacuum in a liquid – for our purposes that would be water. When a bubble impacts an object (when nothing meets something) it generates a shock wave on a microscopic level that implodes with a certain force against the object it encounters. The energy released in the shockwave correlates to the size of bubble. Bigger bubbles implode with greater force. The size of the bubble is a function of the ultrasonic frequency used to generate the bubble. It is this implosion, the release of energy, that removes particles from vinyl records. Perhaps a less than apt analogy is using a pressure washer to clean your driveway.
Imagine an open USC tank filled with water. Regardless of the location of the transducers, the generated bubbles swirl everywhere in the water until they implode or dissipate on the surface. The transducer action of continual bubble creation causes agitation in the water. Looking at an open USC tank in operation you can actually see this – you can’t quite see the bubbles unless they are generated at a low frequency, but you see movement in water.
Open USC tanks, of the type described in my articles, usually have the transducers on the bottom of the tank. (I focus on small desktop units. Larger industrial scale tanks may have transducers also on their sides.) The number of transducers typically depends on the size and cost of the tank. The Elmasonic P120h has 6 transducers dispersed in a pattern across the entirety of its bottom and these easily generate a continuous tankful of cavitation bubbles. The Elma includes a ‘sweep’ mode to optimize sound field distribution within the bath. The filtered water return also causes movement in the water.
The cavitation bubbles must reach the record to do their job. Using a USC with sufficient output will fill the tank with bubbles. If a record is in the bath and water reaches across its lead-in to its run-out area, then the ultrasonic action is cleaning the record. The surface area of the record is fixed. There is likely some amount of ‘buffer’ area water around the record (a capacitor of bubbles, if you will) that can continually meet that surface area with a fresh supply of bubbles.
I’m not aware of a “golden” number for the amount of space there should obtain between records to insure there is enough water (enough bubbles) between two adjacent records. I suspect that 1-inch is a minimum, but I’ve not done testing on that. I do know that 1½-inch spacing works just fine in my setup. I use two pucks from the Kuzma RD kit between each record. If you used only one puck between records you could clean maybe 10 records at a time. I haven’t tried that.
Rest assured that with the right equipment you can easily clean multiple records at the same time.
tima
Hi Tim,
Here is some info from Degritter on the placement of the transducers.
And explains there reason for the choice for side position.
Based on the “Power Ultrasonics” by W. Lauterborn, R. Mettin in 2015, the amount of ultrasonic cavitation bubbles significantly diminishes with the increase of distance from the ultrasonic transducer. Placing transducers at the sides increases proximity of transducers to the record surface and enables an even energy distribution to begin with. Placing them at the bottom will result with diminished cleaning effect near the top. Link to the book:
https://www.sciencedirect.com/book/9781782420286/power-ultrasonics
/Paul
Thanks for you comment, Paul – your interest is appreciated.
I do understand about placing transducers on the side of a tank and aiming them at a record. I’ve read the Degritter literature and many responses on forums from their representatives. They do a fine job selling their product and perhaps have the most thorough marketing team of all the USC RCM vendors, so hats off to them for venturing into what is becoming a very active area of analog interest. The more opportunities people have and take to clean their records, the better for the viability of the vinyl format. I have not tried the Degritter so I cannot comment on its effectiveness but their approach makes sense for cleaning a single record.
As regards a DIY USC setup similar to what I describe in my articles, there are a few things to keep in mind:
1. A significant DIY goal is to clean more than one record at a time. Presumably the primary goal of a Degritter or KLAudio or Audio Desk unit is to clean one record at a time. Form tends to follow function.
2. The Elmasonic units have multiple transducers on the tank bottom based on tank size – 6 transducers in the case of the P120h. You can see the result of the ultrasonic action on the surface of the water. The transducers are arrayed such that their action covers the entire tank. The Elmasonic ‘P’ units include a Sweep mode that aids in optimizing the distribution of the sound field through the tank. I vaguely recall the Degritter has a similar function.
3. Records continually rotate in the bath. In my configuration each record is within ~3¼” of the bottom of the tank during each rotation. Some where between ⅓ – ½ of the record is submerged at any given moment.
4. It makes sense that the number of bubbles is diminished the nearer to the top of the tank they get because coming up from the bottom they impact against records and the sides of the tank as they rise. I would not be surprised if the concentration of bubbles is greater nearer the transducers. That does not depend on transducer placement. However the generation of vacuum bubbles is continual for as long as the timer is set; because of that I speculate the overall amount of potential cavitation energy remains constant throughout a cycle.
In practical terms for we audiophiles, it is difficult to gauge cleaning effectiveness other than to assess results against our goal, namely clean records. Absent some rule or formula my guideline is what I call the Ellington Test: If the record sounds clean, it is clean.
Please stay in touch if you have other comments to share, particularly about different approaches.
tima
To add what little I can to Tim’s response, there is a formula for transducer power, bath size and number of records that I think was reprinted on page 5 of the long DiYAudio thread (and may be quoted in an introductory piece to one of Tim’s installments here). Not sure how much it addresses optimal spacing between each record but worth a look. Here it is, at post #44 on page 5 of that DIY Audio thread: https://www.diyaudio.com/forums/analogue-source/218276-version-ultrasonic-record-cleaner-5.html
The KL doesn’t effectively remove fingerprints (smudge?). I went to combined methods, using ultrasonic as one step after pre-cleaning using something like AIVS #15 (+rinse) for other reasons- and that will certainly remove fingerprints as well. It may also help with other smudges– not sure what you are dealing with in particular, but my difficulty, even with the AD (early versions) and KL was that old non-pristine records not owned by audiophile collector types that needed more work benefitted considerably by multiple method cleaning.
bill hart
Hi Tim & Bill,
My sincere thanks for taking the time to help me, and Tim you have put my mind at rest. I have been in this hobby for 47 years and my progress has been slow and has included a number of unfortunate rearward lurches over the years. There is so much misinformation, overpriced equipment and items that are not snake oil but poison, to wade through. But I am finally nearly at the summit I have wanted to reach. 6 years ago I finally got comfortable with having found the right cartridge alignment tools, and this year I have finally refined my vinyl system such that I am really happy with the reproduction quality and not irritated by this or that aspect. But for me, the equipment is merely a means to an end and not something in itself such as bragging rights: and the end is of course the transformative experience of being able to recreate a sensationally realistic musical experience. And this brings me to my Final Frontier, the records and how to clean them. I cannot tell you how helpful your articles on record cleaning on thevinylpress are to me. Having read a reasonable amount here and there and from my own RCM experience, I have come to the conclusion that there is not one commercially available US RCM that will do what needs to be done. And Tim, your setup and your explanations make every bit of sense to me. And from them I can go straight to an excellent setup. Once again, many thanks for sharing your knowledge and experience.
I would be grateful if you could help me with one more thing. I have little DIY experience or aptitude, but can follow instructions. The final matter that I am grappling with is what pump to buy. I live in Hong Kong which has a 230v 50hz electricity supply. Thanks to your references I have started reading the very informative diyaudio.com thread. As an aside, what a pleasure to read a thread where the participants are polite and enjoying their hobby and helping each other and not aggressively exercising their egos at others expense. In the thread I did come across a reference to the Sicce Syncra Aquarium Pump 0.5 (185 GPH). I guess it is powered by a wallwart. I do want a pump that can run throughout the cleaning process. Any suggestions on pump or specs would be greatly appreciated.
All the best,
Chris
Thanks for you comments Chris, they are appreciated,
Answering the question “what pump should I use for my DIY RCM?” can quickly get into the weeds with calculations on PSI, Head-Feet, Flow Rate, plumbing friction and so on. I am not an expert on pumps or plumbing. Fortunately in RCM world we’re dealing wth relatively small amounts of water, heights and distances and many pump manufacturers supply the requisite data with their pumps.
But we do want to give passing recognition to the dimensions of the USC tank. You did not say which USC tank you’ve chosen. I’ll assume the Elmasonic P120h which holds a maximum of 12.75L (roughly 3.4 gallons) and is 321mm (approx 12.6 inches) height. (Fwiw, the P120h is a top-class unit. It’s a bit pricey, but is super nice to work with. Too many people dismiss the use of dual frequencies, perhaps because of the increased cost, yet, imo, they are one of the keys to effective cleaning across a broader range of record conditions.)
The pump I describe in my articles is the Little Giant 1-AA-OM. Use in HK lilkely requires a converter or transformer in front of it – not that big a deal but still an additional component. Be that as it may, I look at its specs as a guideline because it works very well in the filter setup I describe. Specs for the 1-AA-OM are in terms of gallons per hour for a given Head. In simple terms, ‘Head’ is pump talk for the height a pump can raise water up. It’s related to the amount of pressure the pump can deliver, usually expressed in pounds-per-square-inch (PSI). The performance of the 1-AA-OM is 110 gallons per hour (gph) at a Head of 1 foot with a pressure of 3 PSI.
A rate of 110 gph works out to 1.83 gallons per minute. My max cleaning cycle runs 10 minutes at 37 kHz and 10 minutes at 80 kHz. So, in 20 minutes the pump can move 36.6 gallons of water. For a roughly 3 gallon tank that means the entire tank gets pushed through the 0.35 micron filter about 12 times in a cycle. There’s probably some friction factor associated to the filter itself. Also, I don’t fill the tank to the top – it has a water line as a guide and to reach a record’s run-out area the amount of water used is just a ‘smidge’ above that – that’s why I use 3 gal instead of 3.4g max capacity. (It’s much easier for me to work in US metrics so I’ll let you convert.) All of this is theoretical based on published numbers and my guesstimating, but its roughly accurate.
I gauge the effectiveness of the filtering – here ~12 tanks in 20 minutes – by using a TDS (total dissolved solids) meter as described in my last article. I consistently get a reading of 004ppm after a cycle and I judge that satisfactory.
I looked at the Sicce USA Web site and the specs for the Syncra line of pumps. The Syncra 0.5 is rated at 185 gph with a head of 3.9 feet. Given the above account of my Little Giant, the Syncra 0.5 is more powerful and should do the job just fine assuming a similar tank size and capacity. I cannot speak to that pump’s operation or reliability as I’ve never used it. But there you go.
By the way, you want to have the pump before the filter to push the water through it. Also, when starting out, fill the filter canister to the brim when you screw its lid on, otherwise there will be air in the filter making it hard on the pump and much less effective filtering.
tima
I finally received my Kuzma RD and I have (successfully) completed the build of my DIY RCM which replicates what Tim has built. I am using the same Elmo, pump, filter and liquids.
What I am uncertain about is the drying process. I am concerned that air drying could result in some “residue” being left on the LP. So, for now, I am running each record through a 2 minute wash/rinse cycle in my KL Audio, followed by a drying cycle.
Aside from the added time it takes to do this, does anyone think this is a bad idea? Am I defeating the purpose of starting with the DIY cleaning process? I have yet to do any real comparisons between using the DIY RCM and the KL Audio but that is next on my list.
What do people think?
Hey D: I’ll let Tim comment on his experience in air drying records after the DIY wash, since he has gotten good results without any additional forced air or vacuum drying. I use my Monks sometimes in combination with the KL but it isn’t about ‘drying’ per se (since the KL can force air dry a record), but instead, getting another shot at removing contamination, fluids, etc. from the record using Reagent Grade 1 and vacuum, point nozzle style.
I’d be interested in a comparison between the KL and the DIY. I think the combo of some mild surfactant and US, with the added filtering, is the ‘killer app’ here, but I’ve put off buying the Elma and building one since my KL is still running fine and I’ve been dealing with a lot of old records that i acquire second hand, which benefit from pre-wash using AIVS No. 15, Monks vacuum, Reagent water rinse, US wash in the KL and a final go on the Monks to eliminate the last vestiges of tracing distortion. If I go through all that trouble- sometimes, multiple passes, and the record is distorting or has other issues, I know cleaning won’t remedy this.
PS: As a necessary caveat, KL does not recommend removing a wet record from its unit b/c of some potential for frying the electronics. Just have to say that if you are going to experiment on that end.
Let’s see what Tim says.
Bill,
The pre-wash on dirty records is often a must. I haven’t tried any of those yet in my DIY. I am curious if I can avoid the pre-wash. Most of what I buy isn’t that dirty but it happens.
My use of the KL Audio following the DIY is to both rinse the record as well as to dry it. The liquid in the KL Audio is just distilled water so it should remove anything that stayed on the record after the DIY cleaning.
I am curious what Tim says.
I’ll offer my response to David’s and Bill’s comments in a single reply. First off, thanks for commenting.
If you feel like you get a better result cleaning multiple records more than once in two different machines, then you’ve found a way that works for you which is great. I say go for it.
It was out of a desire to avoid a separate rinse step and to save time that I took a keen interest in filtering the tank water. This was based on my theory that whatever is in the water at the point of drying the record – however it’s done – will remain on the record after the water evaporates.
A key to assessing the relatively cleanliness of the water before putting records in it, and upon removing records from it, is to test it. Currently I use a TDS meter, as described in my third article. This lets me keep track of the water and gauge the effectiveness of the filtering system. I test before and after running a cycle of 5-6 records.
When I first fill a tank using distilled water and a certain amount of IPA and a v. small amount of Ilfotol, the TDS meter says the water measures at 000ppm – 001ppm for a little over 3 gallons. Typically after the first and second cleaning batches, that number will go to 002- 003ppm. By the fourth batch of records the meter says the water measures 004ppm and from then on it does not go higher. That number has been very consistent. That’s a tribute to the filtering.
I measure the water before I introduce the records and after I take them out. If the number (004ppm) goes higher, I change the tank, starting with fresh-from-the jug distilled water. Before filling the tank to its operating level, I will put in 1-2 gallons of new water sans chemicals. I’ll run the filter and the Elma’s Degas mode for 10 minutes while heating the water to 30° C, then let system run filtering the water for 20-30 minutes. If the test reading says 000ppm – 001ppm then I presume the tank is clean. I suppose I could fill it with a full 3+ gallons to be super-thorough.
Given all that … when a batch of 5-6 records complete their cycle and their spindle goes back on its stand at the 45° angle to air-dry, I assume that whatever water is on them is as clean as the water in the tank, viz, 004ppm. That works for me based on listening – and it works quite consistently.
Running a cleaned record through the KLAudio unit using only distilled water, after cleaning it in a DIY machine may reduce that 004ppm dissolved solid to a lower number. I don’t know. The water in the KLA unit measures probably 000ppm – 001ppm when you first start using it as a rinse tank assuming the KLA tank itself is clean. If it hypothetically removes more dirt from a record, how many rinsings will you get from that tank of water until it deposits more dirt on the record than was there when you took it out of the DIY unit? I don’t know that answer. I suppose the only way to know is to test the KLA water with a TDS meter.
One thing I read from Audio Desk and KLAudio users is the difficulty in cleaning them. I felt like I never got my own AD machine as clean as it was when new; everytime I tried to clean it I got some dirt out of it. Is filter certainly got dirty over time. That’s anecdotal and before I started testing water.
If someone comes up with a better, reasonable-cost way to test for dirt in water than the TDS meter, I am very open to learning about that. If there is more efficient filtering mechanism, again at reasonable cost, I’d love to hear about it. My house drinking water goes through a 3-stage reverse osmosis filtering system and that typically comes in at 028ppm – though that’s not using distilled water.
My response to skepticism about air-drying or concern that there may be some residue on the record as it air-dries is pretty much the same as I describe in my articles. Air drying is no different than fan drying – they both use evaporation to dry the record. Whatever residue is in the water before drying likely will be on the record after drying. Air drying with a two sided fan (or however the KLA unit does it) may speed up the process a bit, but the result is the same – the water evaporates from the record leaving behind whatever solids are in the water. To my knowledge today, that will be true for any fan-drying RCM on the market today.
Of course all this is what works for me. If you find that fan drying or using an additional cycle in the DIY rig or other machine makes a real difference, I’d love to hear about. I suppose a way to test is run some records through your DIY system, listen to them, then run them through the KLA machine and listen to them. I’d really like to learn the results if you try that.
Thanks again for your comments.
tima
Tim,
Thanks for the detailed comments. Everything you are saying makes sense.
In general do you use a small fan to aid the air drying? If so, what fan are you using?
Today I am going to just do some air drying on most of the LPs but I am going to use the KL Audio on one LP out of the same box set and see if I can hear any differences.
Sometimes I do use a small fan as part of my air-drying routine.
If I am cleaning more than a spindle-full (5-6) of records I may use a fan on the first batch to reduce drying time while the second batch is cleaning. By the time the second batch comes out of my DIY RCM from its 20 minute cycle, the first batch is usually dry. That means I’ll put the second batch on its spindle to start drying and put the first batch into their sleeves and covers. I may then use the fan on the second batch such that by the time the first batch is put away and (if I choose) its spindle is filled with a third batch which then goes into the USC, the second batch is dry and ready for its covers. And so on… The fan does not improve cleaning; it simply aids the drying process a little bit.
The fan I use is square, small, very quiet, has three power settings and a timer. It can run off batteries or USB power from an USB socket or wall adapter. The fan has 7 blades and can rotate thru 90° for aiming: OPOLAR 5-inch desk fan. I bought it via A’zon for ~$15. It has worked fine for the past year.
I place the fan about 2-3 feet from a spindle of records aimed perpendicular to the spindle and only run it on low speed. I’m trying to gently circulate air around the records, not blow the moisture off with pressure.
tima
My thinking on all this is starting to evolve after today’s cleaning and listening. Of course, I reserve the right to change my mind…
I washed 18 records today including the John Coltrane 1958 box set. Everything was air dried except for one of the records which I put through a rinse and dry cycle so I could compare them.
What I found was that the air dried LPs were the quietest and the one put through the KL Audio for rinse and dry was noisier. This is a very limited sample so I am not ready to conclude but it is a good data point.
If this does hold true in more instances I think it will point to the fact that one of the most critical parts of the process is that the cleaning liquid be as pure as possible. I know this is what Tim has concluded and my early testing is confirming this. The water in the DIY is always clean given the filtration process. The water in the KL Audio contains all the contaminants that have come off other LPs and could now attach the current LP being cleaned. I can’t say the difference is night and day and one can change the water in any cleaner often, but the benefit of the DIY with filtration is that the water is constantly being cleaned.
More to come…
Thank you David for relaying the result of your test – an excellent report.
Adopting an USC with a seamless stainless steel tank with rounded corners assures the opportunity to maintain a clean washing environment.
And yes, using high-quality chemicals is a key to keep the particulate count low in the bath. I use 99.9% pure Isopropyl Alcohol from MG Chemicals. PDF data sheet here:
https://www.mgchemicals.com/downloads/tds/tds-824-l.pdf
I received my TDS meter today and tested the liquids in both my USC bath and the KL Audio.
The USC bath liquid measured between 3 and 4 ppm. I have probably cleaned 30-40 LPs with this solution.
The KL Audio measured 18 – 19 ppm. I have cleaned fewer than 25 records since changing the water.
That is a significant difference. I have no idea if 18 ppm is a big number with respect to purity. Maybe someone else can comment on that.
Hi Tim & Bill,
Thanks to you both for this series, which has been incredibly helpful and insightful, and inspired me to take the next step. After nearly two years I’ve finally thrown together my own system based on this one, with just a few alternate components. I cleaned about 40 records this past weekend and while I am still trying to find the time to listen to them, initial results have been great (very small sample size, though).
Other than the pump, the main difference was the ultrasonic unit – I didn’t have the budget to start with an Elma, but looked for a Chinese unit with many of the same features and went with the Dekang DK-410FTS. I’m open to the future upgrade, but wanted to start somewhere for proof of concept.
(https://www.alibaba.com/product-detail/DK-410FTS-10L-Ultrasonic-Lab-Equipment_60662962354.html?spm=a2700.7724838.2017115.24.107b3668rkP8Ht)
I just really wanted to play with the system a bit before getting down to more rigorous control tests: I plan to play a used record at different stages of clean – straight out of the shipping box, vacuum cleaned, ultrasonically cleaned – to see if I can find a tangible difference. I will also before/after play records cleaned with the Audio Desk.
In the meantime I have a few operational questions that your articles haven’t addressed (or I’ve glossed over), and some observations.
–> Do you drain the system after each use, or keep everything connected as-is? I have limited space in my apartment “lab” (aka kitchen) and plan on breaking down after each session to reclaim counter space, but also keep the equipment as sterile as possible. If you drain, do you toss the water in the filter canister?
–> Have you ever run into cavitation creating splash marks on labels? The Kuzma allayed my fears early about water droplets (a huge pain on my AD), but I did notice a few of the first batch in the DIY machine left water marks on a label or two from splashing. I think this might just require fine-tuning the power settings to keep the surface of the water from getting too choppy.
–> I think this will require experimentation with the % of cleaning agents in the bath, but I noticed some buildup on the first few batches while they were drying. It’s possible surface contaminants on the water that came off when pulling the records out of the bath, and airborne dust, but I was concerned enough to follow the air drying with a distilled water rinse run on my VPI.
I also found that records were still wet after 30+ minutes, which is likely down to air conditions in my apartment, but I’m also considering instituting the final rinse as a standard process – there is still the irrational part of me that doesn’t like *any* residue, even if it is diluted alcohol and wetting agent, left on the records. But I also wonder if I could actually be transferring dissolved solids back onto the records via the VPI? Or am I just being paranoid?
Thanks again for making it easy for the rest of us to follow down the same path!
Mike
Mike, I thought I would add some comments since Tim and I have been running very similar systems for a while now.
I leave everything as-is after a cleaning session. I only change the lliquids when then TDS meter says 0006 or higher. This can last a long time. When water evaporates I just add more distilled.
What is causing the splashing? Is it from the return hose from the filter? If so, add some length to the hose and have it return the filtered solution deeper into the tank. I never get any splashing with my setup.
Regarding drying, I would not have anything touch the LP after the process is complete. I think rinsing and trying in the VPI will likely add contaminants. Are you using a small fan to aid in the drying? That’s what I do and I find at after 20 minutes the LPs are dry.
David
Appreciate hearing other’s feedback as well! I think my biggest issue is not having the space to leave the unit in situ after a session, so I’m not sure anyone else will have that same problem.
The splashing was from the cavitation – I take the hose out during the ultrasonic bath and only put it back when running the filter when there are no records in the tank.
I have not tried a fan yet, as there is the part of me that thinks I might make things worse by blowing dust around. I should just suck it up and give it a try.
I run the entire system the entire time I clean records. I have 2 pumps. 1 pumps to a radiator to keep the liquid temperature at 30C and the other is for the filter. I keep everything running during the cleaning process.
I assumed that water movement would affect the cavitation and ran the filter after each spindle. Wouldn’t water flow disturb the flow of bubbles from the transducers?
Hi Pete – thanks for your kind words, questions and interest.
Looks like the Dekang DK-410FTS has 4 transducers. It wasn’t quite clear from the Alibaba page what is the machine’s operating frequency. And you have the Kuzma RD and a similar(?) pump and filter setup. I did what you are doing now, also with a Chinese USC as part of a “proof of concept”.
Gathering your many question together, I’ll try answering:
Q: Do you drain the system after each use?
A: No. I do a complete replacement of all water+solution when the latter gets dirty according to a TDS meter (6-7ppm) – or after cleaning so many records. I won’t go past 80-90 records cleaned.
Q: If you drain, do you toss the water in the filter canister?
A: When the tank water is replaced so is all other water. I’ll unscrew the filter canister cap and empty the canister. You can also remove the filter and rinse it in distilled water.
Q: Have you ever run into cavitation creating splash marks on labels? I think this might just require fine-tuning the power settings to keep the surface of the water from getting too choppy.
A: Generally, no. Just being in water means there is potential for a record to get a drop on its label. I have the height of the record adjusted so the water just comes into the run-out area, although that can vary according to the record. I did have an occasional drop of water when using the Audio Desk.
Q: I think this will require experimentation with the % of cleaning agents in the bath, but I noticed some buildup on the first few batches while they were drying. It’s possible surface contaminants on the water that came off when pulling the records out of the bath, and airborne dust, but I was concerned enough to follow the air drying with a distilled water rinse run on my VPI. … I take the hose out during the ultrasonic bath and only put it back when running the filter when there are no records in the tank. … I assumed that water movement would affect the cavitation and ran the filter after each spindle. Wouldn’t water flow disturb the flow of bubbles from the transducers?
A: A ‘buildup’ of what? My approach is predicated on running the filter throughout the entire US cleaning cycle. With 6 transducers the Elma P120h tank is filled with cavitation bubbles. The filter return may move the tank water some (as does the rotating records) but, imo, the practical impact is small if any. Energy is continually put into the water. If you feel this is an issue you can reposition the return – try it on the water’s surface or you can increase the cycle time. But, imo, I would not turn off the filter during the cleaning cycle. The idea behind keeping the water as clean as possible (the basis for running the filter continuously) is to avoid the need for separate rinse steps. This is where the TDS meter comes into play, informing about the cleanliness of the water.
Q: I also found that records were still wet after 30+ minutes
A: I assume you position the spindle at a 45-degree angle for drying. Do you use a wetting agent such as Ilfotol in your solution? That helps water sheet off the record when you pull it from the tanks. As David mentioned, a small fan can help – see me upstream msg on this. Run at slow speed just to keep the air circulating.
Thanks for your participation.
tima
Thanks for the thorough response! Here’s an image of the buildup I was seeing on records that were air-dried (https://www.dropbox.com/s/ag82nnpspngi272/2019-08-24%2013.21.56.jpg?dl=0) – the sharp line makes me think it was contaminants on the surface of the water.
Knowing that continual filtration won’t affect the ultrasonic process, I’ll engage that going forward. I’m still at 2ppm TDS after cleaning about 50 records and filtering after each bath, but I’d much rather reduce any contamination during the process. By comparison I tested my AD and it’s at 6ppm less than 10 records into a new gallon of water.
The splashing was only from the cavitation, but I’ve chosen a less turbulent bath setting and it seems to be fine now. I was constantly getting a stream of drops on the label using the Audio Desk, one of the many things that I was disenchanted with over time of owning it. I couldn’t clean more than three records in a row before every fan cycle would spray water all over the label. It also got to the point where using the manufacturer’s cleaning solution would create foam to the point of soaking the label. This was a large reason in following your lead to this system with it’s minimal moving parts, and lack of constant need to replace components.
Yes, I’ve been drying at 45 degrees on the Kuzma spindle, and also purchased a second one like you did. And I’m using the same IPA/Ilfoto mix you’ve described. I’ll give the fan a try.
I have gotten the same residue line on the drying record as you have. I clearly it is some substance that is on the surface of the water. I have found that if I wipe the record with the dry brush that came with the Kuzma right before I re-sleeve it it comes off easily and I never hear it when I play the record.
David and Pete
Thanks for the photo of the ‘residue’. And thanks both for your report on that.
It does seem like the records must have been fairly dirty to start.
I am surprised at this relative straight line of dirt on the record because I have never seen anything like that on those I’ve cleaned. My initial thought was of its angle. At first blush, thinking of a record turning on a spindle and residue on the water’s surface and lifting the spindle out f the water I’m not seeing how such a straight line of residue at that angle is created. I’m imagining that such a line could not ‘slide’ to that angle and remain so straight. All of those thoughts could be me not looking at problem in the right way,
My second thought was there should a line of residue on the opposite side of the label. Is there? Is there such a line on the other side of the record? Do all records on the spindle show this or only the ones on the ends?
Do you have any sense of the dirt being there when you remove the spindle from the water with the water sheeting off it? Do you see it on records while they dry?
Sorry for all the questions – just trying to think this through.
Be that as it may, David your speculation that this is some substance on the surface of the water makes sense. Which makes me wonder why is it on the surface and not swirling around in the tank? Given the movement of records, ultrasonic action, drain and return, what keeps the residue on the surface? Taking a cue from guys with aquarums (not me) who talk about protein skimmers, maybe the residue you’re seeing has protein or some oily substance in it that causes it to float. Hmmm…
Sorry for the lengthy reply. To me this a very curious issue that I’d like to understand better. It’s a good thing you can brush it off a dry record and have no audible effects.
If you have further thoughts on this, please lay them out. Thanks.
tima
ps – Pete sounds like your flter is working well!
Hello Tim,
Thank you for a brilliant write up, very through and useful, have now migrated from the threaded vacuum system to Ultrasonic and went down the route of Elam P120H, my initial experience with the unit on full power with sweep for 20 min at 37 kHz resulted in extreme water temperature rise from 45 to 48 C. from the image you used showing the Elma dash board I noticed you set the power at 60%, is that what you use and if so its sufficient power for a 20 min. cycle, does it keep the water temp within 30 to 37 C.
Sami
Hi Sami,
Congratulations on getting the Elma P120H. It works really well and I’ve had no problems with mine. And thank you for your kind words about the articles.
As to power – when I first started with the P120H I experimented and initially ran it at 60% power. Now I generally use 80% power. I run a 10 minute cycle at 37kHz and another for 10 minutes at 80kHz. I set the thermostat for 30° C. I don’t typically see it go beyond 32° C- 35° C by the end of the last cycle. In my opinion 45-48° C is too hot and I’ve not seen my tank solution go that high. I think the temperature goes up quicker with the lower frequency.
I suggest lowering the power setting from 100% to 80%. If that still leads to high temperature, go to 70%, Also, if you do two cycles at 10 minutes eachl; if necessary you can pause before starting the second to let the temperature come down. Let me know what you find.
Best regards,
Tim
Hi Tim,
Thank you for your reply much appreciated, I have persevered more with running tests on the Elma without any records, in summery a 20 min cycle on full power at 37kHz with the heating switched off will result in an approximate 10C temp rise from whatever the starting temp is.
I spoke with Elma technical support in Germany, who are extremely efficient, helpful and very knowledgable. They indeed confirmed my findings and sent a very helpful document that show the temperature rise effects purely by using ultrasonic at 37kHZ with no heating, I will attach the graphs bellow if I am allowed by the site.
The temperature rise will be less at 80kHz.
Perhaps with your setup, if you are running the filtration system while the ultrasonic is running this will for sure have a cooling effect.
The P120 tank will hold 2.6 US gallons so when running at full power its delivering almost 127 watts of ultrasonic power per gallon, perhaps excessive, at 70% power it will deliver 89 watts which I think should be ample, I am cleaning 4 records at a time and running at 70% , this increases the temperature from 23 C to 28 C in 20 min, in 25 min cycle it increased the temp from 23C to 30C and got to 28 C within 3 min., effectively giving me a temp range from 28 C to 30 C for 22 min which I suppose is good.
Elma suggested to use the alternating frequency option just to provide some temperature rise damping effect, I have noted that you run your cycles 10 min at a time rather than using a 20 min cycle with the alternation of the frequency, do you see any detriment in using the alternating function ?
PS not sure how to upload the Elma graphs.
All the best
Sami
Hi Sami- thanks for participating and thanks to Tim as well for responding to your questions. On the question of uploading graphs, you can’t without a copyright clearance from the rights owner. I don’t see any reason why you couldn’t link to the page where the graphs appear, if they help you make a point.
regards,
Bill Hart
Hi Sami,
Good that you contacted Elma in Germany; they are helpful.
What you describe running at 70% power should work for you. If you clean 4 records at a time you probably don’t need more than that. And that correlates with my running at 80% while seeing temperatures 3-5 degrees higher. So we can probably say that increased power ties to increased temperature which makes sense.
I have tried the alternating frequency option but continue with my two cycles at the constant frequencies of 37kHz and 80kHz. The only downside I can think of with the alternating option, which is 5 seconds alternating, is that it might put more wear on the transducers shortening their lifespan. That is speculation on my part and I have no hard evidence.
After your experiements, when you settle on an approach and clean records, I’d like to hear about your results.
Best regards and good luck,
Tim
I am not a technician, yet I tried to read all these articles. I purchased my stereo equipment in 1973, still have and use it. My 600 plus collection is mainly from the ’60s and ’70s. every time I played an album I Zerostat gunned the album and used a static dust brush. I have decided to clean my collection. I am a DYS system of a Vinyl Stack and an ultrasonic 10-liter cleaner.
Here are questions and if you can answer in laymen terms I would much appreciate it;
1) What chemical do you recommend for the bath?
2) How much per gallon?
3) Do I need to rinse?
4) To air dry can I go total vertical or should I good at an angle?
5) What inner sleeve do you recommend?
Thanks
Rock and roll forever.
PS – one of my favorite albums is Eddie Cleanhead Vinson live in Swisserland.
PSS I try to only purchase analog record albums, I compare it to real wine to synthetically modified wine.
PSS Thanks for letting me Ramble On. (great song and album.)
Hello old time,
In my opinion, it is wise to clean your records. Answers to your questions:
1) What chemical do you recommend for the bath?
– from this article: ~3 gallons distilled water, 1.3 cups Isopropyl Alcohol (IPA), 0.9 tablespoon Ilford Ilfotol
2) How much per gallon?
– see #1
3) Do I need to rinse?
– Maybe. I currently I do not rinse. I do use a thorough water filtration system that operates during the cleaning cycle. And the chemicals used leave minimal residue. While there is an argument for rinsing, my actual results are quite satisfactory. I may introduce a seperate rinse tank in the future.
4) To air dry can I go total vertical or should I good at an angle?
– In this article you can see a picture of my records drying at an angle.
5) What inner sleeve do you recommend?
– I use the Diskeeper™ 2.0 Antistatic Record Sleeve from Sleeve City.
https://www.sleevecityusa.com/Diskeeper-2-0-Antistatic-Record-Sleeves-p/9235.htm
– I use the Ultimate Outer 5.0 outer sleeve
https://www.sleevecityusa.com/ultimate-outer-5-0-record-sleeve-p/9380.htm
– I put the original inner sleeve in the record jacket. I put the jacket in the outer sleeve. I put the record in the inner sleeve and place it between the outer sleeve and the record jacket. This makes it easy to take out the record and saves on jacket wear.
I published 3 articles on my DIY record cleaning machine:
a. https://thevinylpress.com/timas-diy-rcm/
b. https://thevinylpress.com/record-cleaning-timas-diy-ultrasonic-rcm-followup-1/
c. the article you are seeing now.
Enjoy your record collection,
Tim
Old Time- I think Tim and Neil Antin have kicked some ideas around, but not sure whether they reached a consensus. Let’s see what they say. Thanks for writing.
Hi Tim,
I just read your fantastic article and its follow-ups. I’m planning to assemble a setup similar to yours, but I have one question: The filter does not effect the IPA and Ilfortol proportions in the solution? It only filters out solid particles, so I do not need to add either in the process of washing and constantly filtering the water?
Thanks a lot,
Christoph